Objective: Design and implement a mechanical display
In the final lab of the course we will be building a mechanical television using a pre-cut Nipkow disk, a small fan, an LED, and a arduino leonardo
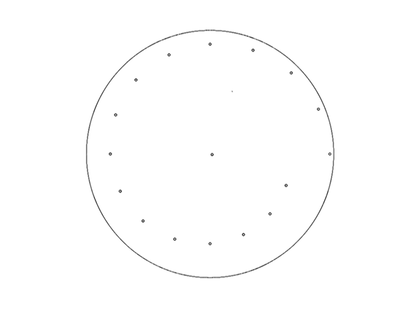
Nipkow disk design
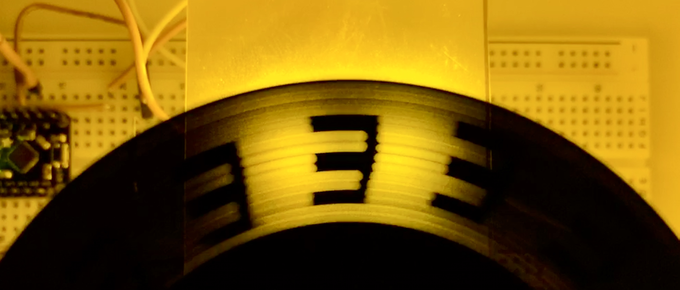
Display in action
Lab Components
- 3-Wire DC Fan
- RGB LED from Lab 1
- DC Power Supply for Fan
- Solder-less Protoboard
- Jumper Wires
- Arduino Leonardo
Part 1: The Hardware
This project is designed to provide you hands on experience spinning up, testing, and programming a mechanical TV.
Procedure:
- Attach the disk to the fan. Hot glue is probably adequate, but other means are OK.
- Power up the fan, and measure its speed. The tachometer is the third line of the fan, and can be used to synchronize the output signal.
- Connect the LED to the microcontroller and insure that it can be turned on and off. The LED will not be driven at its maximum intensity by the microcontroller, but with an amplifier can be driven at its full (350mA) intensity.
- Position the LED behind the disk; find a way to mount it and restrict the field of view.
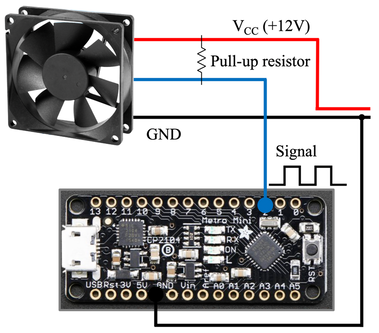
The three pins on the fan. Vcc, GND, and the tachometer
Part 2: The Software
Procedure:
- Map out the shape of a pattern you’d like to write using the display
- Calculate the time between flashes for each row and column.
- Program the microcontroller to trigger the static pattern once the fan reaches its reference point; add an appropriate delay to synchronize the output with the Nipkow disk’s position near the LED output strip.